Showing posts with label paint. Show all posts

Thursday, May 16, 2013

50 shades of Teal - Well 5 to be More Exact.

Ed and I have been living in our apartment for over a year now and we are finally getting around to decorating. When we first moved in we decided that we wanted to live in the space for a while to get a good feel of how we wanted it to look. So now the weather is getting a little better we decided to start trying out some colours. We are going to start with the living room, we want to have one feature wall and the rest will just have a fresh lick of white paint. I wanted to have wallpaper on the feature wall, but I quickly realised that I have VERY expensive taste in wallpaper! The cheapest rolls that I had my eye on were £50, this could prove really expensive because we live in a Victorian house that has been converted into apartments, so we have gorgeous high ceilings. Which means a roll of wallpaper will not go very far in our place. That is when we decided that paint would be cheaper. Teal is probably my favourite colour, so Ed and I decided that would be a good colour to start with. 


What I have noticed is how far out the colours on the paint websites and on the paint pots are to the colour of the paint in the pot! I loved Teal Tension on the Dulux website and on the paint pot but when Ed slapped it on the wall it looked more like a dull navy, the Proud Peacock was disappointing as well, it was too greeny grey. We mixed the two colours together to see if it was any better and it was a little, but when it dried it just wasn't THE colour. We got two more testers today, 1997 Aqua is quite a nice colour but it is just a little bit too drab and then there was Palm Springs. I love this colour it is bright, vibrant and it does have a hint of teal. Palm Springs also looks great in all the different light conditions that we have in the front room. I can't wait to have a whole wall of this lovely, cheerful colour. We also chose a white paint called Blossom White. It has a slight touch of pink, I think it will make the front room look warmer and a bit brighter. I can't wait to start decorating! 

Hope you have had a wonderful week so far <3
Much Love.
xkx

Sunday, December 23, 2012

That's a Wrap!

The day has come to wrap the Xmas presents. I had this idea to stamp our own paper this year and Ed loved the idea. Ed gets the last word in this matter as he is resident present wrapper of the house. Whenever I wrap anything it just looks like a bear has tried to tie paper around a spiny tree.


I bought some brown paper, some festive coloured acrylic paint and some yuletide stamps. I was going to make my own stamps out of foam card but I decided that with the time I had left, ready made stamps were the way forward. 


We had a stamp cube each and kept our cube to our own colour! Ed was green and I was bronze. I thought it was cute how much Ed enjoyed it.


We didn't mind that some of the stamps were a bit smudgy and some were laden with a touch too much paint, after all we wanted to make our own paper so it had that cottage chic flare to it. 


Ed is so good at wrapping gifts that I decided to make him take pictures of all the wrapping steps, to help those poor bears with spiny trees out there like me.  I made the brown paper rosette out of small strips of brown paper glued together and I think the paper looked super cute when the gifts were wrapped up in it. We will definitely be doing it again next year. 


Here is the start of the pile of presents that is growing by the minute as Ed is totally on a mission tonight to get everything wrapped. Instead of labels we decided to write directly on the brown paper in a green pen which has worked out really well. This paper worked out soooo much cheaper than the stuff you buy in the shops and it was really quick to do and didn't take long to dry either because we used acrylic paint. 

Only 2 more sleeps to go!


Friday, July 27, 2012

Ed's Shed - DIY Shabby to Chic Table.

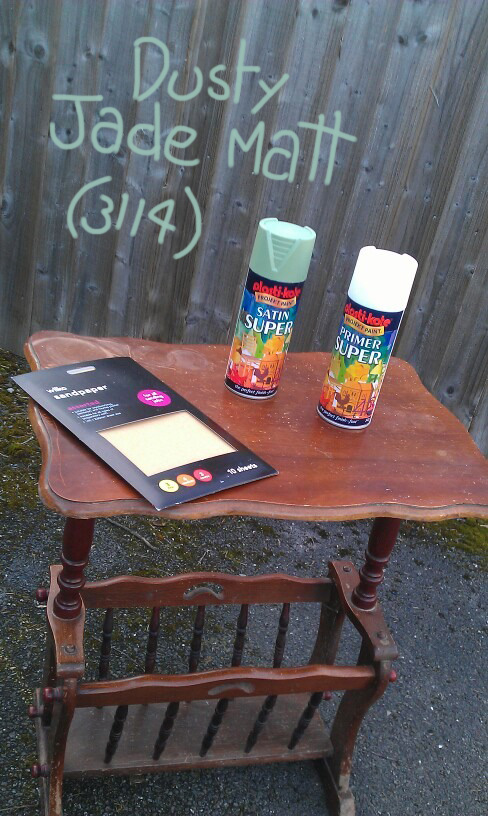
We love shabby chic and we especially love how you can achieve this look by being thrifty and not spending a lot of money. If you take a look in high street furniture shops you'll see new vintage inspired tables, chairs, shelves, everything to give your home a splash of 1950s colour. And you will be pleased to know that all you needed for this this project is some matt spray paint and a very shabby table and you can create a unique piece for a snip of the price on the high street. 


I used Plastikote spray paint, but you can use any brand and colour that you like, as long as it is a matt finish. It is also best to do restoration work outside, that way the dust and paint can't make a mess. First, sand down the table, this gives it a rough surface for the primer to stick to. Sandpaper comes in various grades, from course to fine. Course sandpaper will work fast, but might leave big scratches, so I tend to use finer paper and take my time. Fold a piece of sandpaper into a square and work your way across the surface of the table using a circular motion. Fold up smaller pieces for the hard to reach areas.


Shake the primer can up for a few minutes. Keep the can around 30cm away and start spraying. The trickiest part is resisting the temptation to cover everything in one go. Spray a light even coat, let it dry a little then spray again. Repeat this until the primer covers everything then leave it to dry. Then use exactly the same technique to spray your matt colour layer. 


And there you have it a one of a kind, shabby to chic table.