Showing posts with label diy. Show all posts

Thursday, May 16, 2013

50 shades of Teal - Well 5 to be More Exact.

Ed and I have been living in our apartment for over a year now and we are finally getting around to decorating. When we first moved in we decided that we wanted to live in the space for a while to get a good feel of how we wanted it to look. So now the weather is getting a little better we decided to start trying out some colours. We are going to start with the living room, we want to have one feature wall and the rest will just have a fresh lick of white paint. I wanted to have wallpaper on the feature wall, but I quickly realised that I have VERY expensive taste in wallpaper! The cheapest rolls that I had my eye on were £50, this could prove really expensive because we live in a Victorian house that has been converted into apartments, so we have gorgeous high ceilings. Which means a roll of wallpaper will not go very far in our place. That is when we decided that paint would be cheaper. Teal is probably my favourite colour, so Ed and I decided that would be a good colour to start with. 


What I have noticed is how far out the colours on the paint websites and on the paint pots are to the colour of the paint in the pot! I loved Teal Tension on the Dulux website and on the paint pot but when Ed slapped it on the wall it looked more like a dull navy, the Proud Peacock was disappointing as well, it was too greeny grey. We mixed the two colours together to see if it was any better and it was a little, but when it dried it just wasn't THE colour. We got two more testers today, 1997 Aqua is quite a nice colour but it is just a little bit too drab and then there was Palm Springs. I love this colour it is bright, vibrant and it does have a hint of teal. Palm Springs also looks great in all the different light conditions that we have in the front room. I can't wait to have a whole wall of this lovely, cheerful colour. We also chose a white paint called Blossom White. It has a slight touch of pink, I think it will make the front room look warmer and a bit brighter. I can't wait to start decorating! 

Hope you have had a wonderful week so far <3
Much Love.
xkx

Sunday, April 14, 2013

Allotment Treasure Hunt.

I managed to score some free pallets and lengths of wood to make some potting tables in my greenhouse earlier this week. So today was the day to knock it all into shape. Ed took apart most of the pallet (which I used for the legs) but then he had to do emergency repairs on the greenhouse because it was so windy the polycarbonate sheets were just flying out. He frantically cut some lengths of cane to wedge in the frame, which seemed to work pretty well. I took the rest of the pallet apart and got creating. I had to saw a couple of inches off the longer pieces of wood so the bench was at a nice working height. I was really pleased with the end result, I am finally nearly ready for the growing season! 


We have a bit of land at the back of our allotment which is very overgrown and there is a lot of rubbish that has been thrown there by previous tenants. We are slowly working to clear this area, it will be lovely when it is cleared but it will take a while. These are some of the things that we found today. The toilet is probably my favourite find, the colour is amazing, proper retro. We are pretty sure there is a matching bath in the chaos, but we are nowhere near pulling it out yet!  

Hope you have had a great weekend, even though I bet you haven't found any toilets!

xkx

Friday, July 27, 2012

Ed's Shed - DIY Shabby to Chic Table.

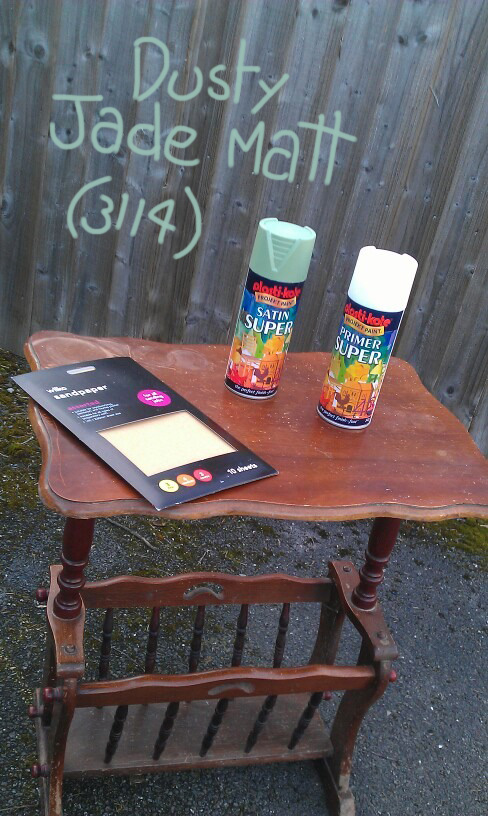
We love shabby chic and we especially love how you can achieve this look by being thrifty and not spending a lot of money. If you take a look in high street furniture shops you'll see new vintage inspired tables, chairs, shelves, everything to give your home a splash of 1950s colour. And you will be pleased to know that all you needed for this this project is some matt spray paint and a very shabby table and you can create a unique piece for a snip of the price on the high street. 


I used Plastikote spray paint, but you can use any brand and colour that you like, as long as it is a matt finish. It is also best to do restoration work outside, that way the dust and paint can't make a mess. First, sand down the table, this gives it a rough surface for the primer to stick to. Sandpaper comes in various grades, from course to fine. Course sandpaper will work fast, but might leave big scratches, so I tend to use finer paper and take my time. Fold a piece of sandpaper into a square and work your way across the surface of the table using a circular motion. Fold up smaller pieces for the hard to reach areas.


Shake the primer can up for a few minutes. Keep the can around 30cm away and start spraying. The trickiest part is resisting the temptation to cover everything in one go. Spray a light even coat, let it dry a little then spray again. Repeat this until the primer covers everything then leave it to dry. Then use exactly the same technique to spray your matt colour layer. 


And there you have it a one of a kind, shabby to chic table.